Showing posts with label rock climbing. Show all posts

Wednesday, May 15, 2013

Rock Climbing Party - Part 2, Favors and Personal Growth


So my daughter's joint-rock-climbing-birthday-party is fast approaching and we're putting the finishing touches on everything.  This has been a lot of fun to plan and also, an unexpectedly good learning / personal growth opportunity for me.  Working with another mom who does not share my over-the-top tendencies has made me realize some things about myself.  Here's the story...

For favors, I was planning:
  • Pop Rocks
  • Carabineers
  • Water Bottles
  • Rock Candy
  • Pet Rocks
  • Custom Artisan Cotton Candy Clouds
  • Chocolate Rocks or Boulders
  • Rock-Shaped Bouncy Balls
  • Gumball Rocks
When I showed the other mom the list, she was agog and said that it seemed like a lot and that the kids would probably be happy with just Pop Rocks and a Carabineer.  This was the thought that popped into my head:  "Who cares?  It goes with the theme!"

This is probably not a healthy line of thinking.  I realized that I have gotten to the point where I am focused more on the theming than the desires of the guests.  Not to say that my favors wouldn't have been well-received - I'm sure that they would have been.  But I'm now trying to make a real effort to scale back on the volume.  Meaning, just because I have several good ideas doesn't mean that they all have to be used.  To that end, favors for this party will be:
  • Pop Rocks
  • Carabineers
  • Water Bottles (which is included in the venue's package)
I think that the kids will love them, they still fit the theme, and they won't break the bank.  To put my own spin on it and to utilize my new found technique of cutting fabric on my Cricut (yes, you can cut fabric on the Cricut - huzzah!), I made personalized muslin pouches for each guest.  It was cheap and easy and didn't even take that long.

Cut your muslin into strips large enough to double over and have seam allowance on the sides and a wider allowance at the top to hold the drawstring.*

Fold in half.  Zip a quick seam up each side.

Iron your seams flat and fold down the top far enough that you will be able to thread your cording through.


Stitch around the folded top almost all the way around - leave a small opening for the cording.  Thread the cording through and knot the ends.

Iron heat bond** to the back of your fabrics to be cut for initials.

Peel off the white paper backing*** and then apply to the Cricut sticky mat.  I put my needle to 5, pressure to highest, speed to lowest.  I used the Classic Font cartridge and did 2" letters.

Once cut, apply letters to muslin pouches and iron on.


*When you decide on the width, think about whether it will be big enough to fit on your sewing machine.  Mine were too small and I had to do the seam around the top by hand.  Not terrible, but not ideal either.

**Be careful with this - it's easy to get confused and iron the heat bond to your ironing board cover or worse - to your iron.  Don't try this if you are tired or distracted. 

***Don't forget this step - you will have a huge mess on your mat if you don't remove the paper.  Also, your letters won't cut well.

Friday, April 26, 2013

Glittery Initials

For my daughter's joint-birthday-rock-climbing-party, I thought that it might be fun to have an initial for each birthday girl to place near her cake on the cake table.  In addition to being a fun design element, it would allow for guests to know which cake is for which birthday girl, provide another opportunity to bring in the party palette of blues and greens (the fave colors of each birthday girl), and would later do double duty as bedroom decor and a fun memento of the event for each girl.

For this project, because I wanted the letters to be free-standing and not too big, I searched high and low for just the right kind.  I went to A.C. Moore and Michael's, but was underwhelmed by their options.  Most of their letters seem meant to grace a wreath or hang on a wall, not stand independently.  I trudged off to Joann's as a last resort and was THRILLED to see that they have a HUGE selection of letters, both hanging and standing styles, in a variety of materials, fonts, and sizes.  I found the perfect sized 3-dimensional cardboard letters for each girl and the price was great as well - with a coupon for one, I ended up paying less than $4 total.

Back at home, prep work involved removing tags and stickers from the letters and then assembling a variety of blue and green acrylic paints from my collection.  I painted each letter using lots of different shades for depth.  I painted all sides of the letters just to be safe.

While the letters dried, I used my paint plate to experiment with glitter and sequins to figure out which route I wanted to take for embellishments.  Sequins were just too much, so scratch that.  I then tried aqua glitter thinking that it would accent both the blue and green hues and bring a little unity to each letter while still letting them be different.  It was OK, but not exactly right.  Whitish-clear glitter didn't have enough oomph.  The blue iridescent flake glitter was the CLEAR winner.  It picked up and enhanced the best of the green and the blue for both hues.  My mama always taught me that you can never go wrong with iridescence and she is right every time!

After drying - I gave them overnight, but they were dry much sooner - each letter received a coat of glossy mod podge and a liberal sprinkling of that gorgeous, flaky iridescent glitter.  I let that sit for a bit and then came the top coat of glossy mod podge to seal the glitter in.  (Nothing worse than errant glitter floating about the house.)  I probably should have let the 1st coat of mod podge sit overnight - while applying the top coat, I did end up shifting a lot of the flake glitter around.  If I do it again, I'll wait longer for the glitter to set.
(Mog podge is not fully dry here - those white streaks are gone in the finished project...)

Thursday, April 25, 2013

Making a tissue paper tassel garland

My daughter and a friend are having a joint birthday joint in June at a local rock climbing place.  I'm really looking forward to it overall, but in terms of decor was feeling a bit stymied about how to bring some personality and prettiness into that cavernous space.  Obviously, I can't decorate the whole building, so I decided to focus my efforts on a single table, which will be used for the cakes and favors.

The table will be in the party loft area, which is in the center of the space and is rimmed by a half wall with a top rail made of pipes.  My plan is to use zip ties to vertically mount 3ft. wooden dowels to the pipe rail.  I can then swag a garland from the dowels.  I decided to make tissue tassel garland because I have an overabundance of tissue paper and they looked pretty simple to make.  I am here to tell you that they ARE in fact very simple to make.  This may be the easiest and most impactful decor element I've ever made and they couldn't be cheaper.  I am a tissue tassel convert!

First step - assemble your tissue.  We have a party palette of blues and greens, so I pulled everything from kelly green to teal to powder blue and some white mixed in to boot.  (Disregard the red in there - I didn't use that.  I didn't use the prints either - too distracting.)
For this project, I pulled out my latest craft find - a large rotary cutting mat.  We have a second-hand craft store in town (I know - LUCKY!!!) and I got it for about $2.  Now that I've used it, I wish that I had bought one sooner.  It's so much less wear and tear on my hands and wrists, which are all ready in bad shape from all the computing and pipetting that I do at work (yes, I am a craft geek and an actual science geek as well - I'm an all-purpose geek, really...).  Now that you have your supplies, it's time to dive in.

Pull out a sheet of tissue and spread flat.  Cut it in half.  Go all the way up - I paused here to take the picture.


Take one half and fold in half.

Fold that half in half the other way.

Zip through with your rotary cutter, slicing up to about 1inch from the fold line at the top.

Make your cuts as thin or wide as you like.  They don't have to be perfectly even and it's OK if you get overzealous and slice some off.  You won't miss them in the final product.  Once you've fringed it up, open it flat and start rolling or pleating the un-fringed area.  I've done it both ways and neither is easier or prettier than the other, so your choice.

Do try to shake the fringes out every couple turns or it will get twisted up.  It's harder to untwist the fringes at the end, so be scrupulous about this now.

Once you've rolled/pleated the whole thing, start twisting the unfringed area tightly to compress into a thick ropey line.  Now twist the ropey line into a loop and twist the bottom of the loop closed.
You are now almost done.  All that remains is to seal the loop.  I've seen washi tape, glue, hot glue, string, and my personal choice - tiny hair elastics.  I found 2 kinds at the Dollar Tree - black and an assortment of blues and clears - perfect for my garland.  (I saw all clear ones at Walmart, but they were $3 for 75 - no thanks, Walmart.  I will take my business to the Dollar Tree.)  I'll be keeping my eyes open for a set of clear ones at the Dollar Tree - I'm sure it's just a matter of time... 

I like the elastic approach because it's quick and easy and cheap doesn't require that I sit near a power source for the glue gun or have to wait for drying time and also no burning my hands - yay!  This means that I can twist absentmindedly whilst watching Buffy the Vampie Slayer reruns (yes, I'm that kind of geek as well.  And incidentally - BtVS is probably the best show in the history of the world.  FYI.  I resisted at 1st because - really?  It's called Buffy teh Vampire Slayer?  No thanks.  But a good friend made me watch it and OMG - it's amazing.  Smart, funny, scary, sexy, romantic, devastating, heartbreaking, thought-provoking...  I could go on...  and on...  and on... sorry).  Anyhoo, reagarding the elastics, I could also theoretically reuse them when I trash the garland.  Just pull off and save the elastics for another time.

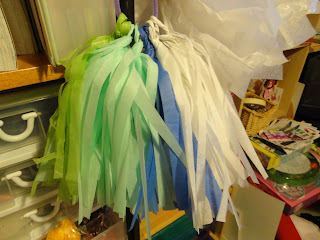
I'm not going to string the garland until the party is closer (will use either twine or this teal rope that I got from the second-hand craft store - $0.50 for the whole roll!), so for now I'm storing the tassels in bunches threaded on pipe cleaners.  The bunches are hanging on a hook in my basement. 

I did also cut a hole in a shopping bag and drape it over top to avoid dust and fading - tissue paper fades like crazy.

Friday, April 12, 2013

Rock Climbing Party - Part 1, Chocolate Pebbles and Boulders

I've posted several times about the upcoming Skylanders party because that is an at-home party and will require a ton of prep work.  We do have another special party coming up before that one, however.  My daughter's 10th birthday rock climbing party is fast approaching, June 1st!  We're holding it at a local rock climbing facility and we're doing our 1st ever joint party with one of her friends.  (Their birthdays are only a few weeks apart and they both wanted to climb, so BLAM-O - joint party!)  It's been fun having another mom to plan with and bounce ideas off of (my husband is NOT interested in party planning.  Like, at all.)

Since the party is now about 6 weeks away, it's time to kick things into gear.  I have some fun ideas for favors which I'll be sharing, but I wanted to post this find because I'm so excited about it.  I was at the grocery store yesterday (Wegmans, which is the best grocery store ever.  It's a fact.) and in the bulk foods section, I found not one but TWO kinds of chocolate rocks.  Score!  I really wanted some for the favor bags, but I am not a fan of buying wholesale candy online - the shipping is ridiculous and the volumes you have to purchase are also ridiculous.  Imagine then my delight when I saw these chocolate pebbles...

... and these chocolate boulders!

THEY LOOK JUST LIKE ROCKS!!!!  I find this amazing.  ABSOLUTELY AMAZING.  Since they are in bulk, I can buy exactly the amount that I need.  I will pop them into little cello bags and voila, the perfect rock treat.