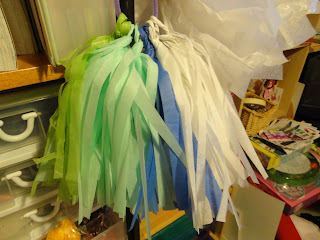
My daughter and a friend are having a joint birthday joint in June at a local rock climbing place. I'm really looking forward to it overall, but in terms of decor was feeling a bit stymied about how to bring some personality and prettiness into that cavernous space. Obviously, I can't decorate the whole building, so I decided to focus my efforts on a single table, which will be used for the cakes and favors.
The table will be in the party loft area, which is in the center of the space and is rimmed by a half wall with a top rail made of pipes. My plan is to use zip ties to vertically mount 3ft. wooden dowels to the pipe rail. I can then swag a garland from the dowels. I decided to make tissue tassel garland because I have an overabundance of tissue paper and they looked pretty simple to make. I am here to tell you that they ARE in fact very simple to make. This may be the easiest and most impactful decor element I've ever made and they couldn't be cheaper. I am a tissue tassel convert!
First step - assemble your tissue. We have a party palette of blues and greens, so I pulled everything from kelly green to teal to powder blue and some white mixed in to boot. (Disregard the red in there - I didn't use that. I didn't use the prints either - too distracting.)
For this project, I pulled out my latest craft find - a large rotary cutting mat. We have a second-hand craft store in town (I know - LUCKY!!!) and I got it for about $2. Now that I've used it, I wish that I had bought one sooner. It's so much less wear and tear on my hands and wrists, which are all ready in bad shape from all the computing and pipetting that I do at work (yes, I am a craft geek and an actual science geek as well - I'm an all-purpose geek, really...). Now that you have your supplies, it's time to dive in.
Pull out a sheet of tissue and spread flat. Cut it in half. Go all the way up - I paused here to take the picture.
Take one half and fold in half.
Fold that half in half the other way.
Zip through with your rotary cutter, slicing up to about 1inch from the fold line at the top.
Make your cuts as thin or wide as you like. They don't have to be perfectly even and it's OK if you get overzealous and slice some off. You won't miss them in the final product. Once you've fringed it up, open it flat and start rolling or pleating the un-fringed area. I've done it both ways and neither is easier or prettier than the other, so your choice.
Do try to shake the fringes out every couple turns or it will get twisted up. It's harder to untwist the fringes at the end, so be scrupulous about this now.
Once you've rolled/pleated the whole thing, start twisting the unfringed area tightly to compress into a thick ropey line. Now twist the ropey line into a loop and twist the bottom of the loop closed.
You are now almost done. All that remains is to seal the loop. I've seen washi tape, glue, hot glue, string, and my personal choice - tiny hair elastics. I found 2 kinds at the Dollar Tree - black and an assortment of blues and clears - perfect for my garland. (I saw all clear ones at Walmart, but they were $3 for 75 - no thanks, Walmart. I will take my business to the Dollar Tree.) I'll be keeping my eyes open for a set of clear ones at the Dollar Tree - I'm sure it's just a matter of time...
I like the elastic approach because it's quick and easy and cheap doesn't require that I sit near a power source for the glue gun or have to wait for drying time and also no burning my hands - yay! This means that I can twist absentmindedly whilst watching Buffy the Vampie Slayer reruns (yes, I'm that kind of geek as well. And incidentally - BtVS is probably the best show in the history of the world. FYI. I resisted at 1st because - really? It's called Buffy teh Vampire Slayer? No thanks. But a good friend made me watch it and OMG - it's amazing. Smart, funny, scary, sexy, romantic, devastating, heartbreaking, thought-provoking... I could go on... and on... and on... sorry). Anyhoo, reagarding the elastics, I could also theoretically reuse them when I trash the garland. Just pull off and save the elastics for another time.
I'm not going to string the garland until the party is closer (will use either twine or this teal rope that I got from the second-hand craft store - $0.50 for the whole roll!), so for now I'm storing the tassels in bunches threaded on pipe cleaners. The bunches are hanging on a hook in my basement.
I did also cut a hole in a shopping bag and drape it over top to avoid dust and fading - tissue paper fades like crazy.


No comments:
Post a Comment