Sunday, March 17, 2013

Easter Fabric Flower and Carrot Centerpiece

On Saturday, we will host our 1st ever Easter Egg Hunt for neighborhood kids and friends.  I'm very excited about it and have been busily filling eggs, assembling supplies, and making some decorations to add to the fun.  Today I'm sharing a play on a flower arrangement that I made using some basement finds.

The vase was from a flower arrangement that my husband sent me a few months ago.  The flowers were amazing, the sentiment was touching, and the vase was WOW.  I just loved the color, the shape, everything.  What's nice about it beyond all that is that it's SUBSTANTIAL, but the opening is narrow, so you don't need a ton to fill it up and have it look full and stay upright.


I tossed in a few chunks of Styrofoam to serve as a base.  I then turned my attention to the fillers.  While unpacking my Easter decorations, I found a little baggie filled with fabric carrots and flowers that my mom had made.  She was making one of those cloth baby books where you have numbers to match, buttons to do, zippers to zip, etc.  She didn't like the way her carrots had turned out, so she started over and gave me the rejects.  I had planned to make a garland, but hadn't gotten around to it.  Anyway, with a little hot glue and some bamboo skewers...


... I ended up with this.


I really like how it's a fun play on a floral centerpiece.  I also like how it was free.  I like that part a lot.
It will look great (I hope hope hope) on my treats table.  Lots of height and visual interest.  And did I mention that it was free?

Skylanders Party Planning - Part 2, Elixir Inspiration, Portal Punch, and Archery Targets (in progress)

The planning continues for the Skylanders Party, albeit slooooowly.  (My attention has been focused on our upcoming neighborhood Easter Egg Hunt.  More on that later...)  But I have had some cool finds and ideas that I'd like to share.  Firstly, while enjoying a nice bottle of Orangina, it occurred to me...


 ...that an Orangina bottle sure does look a lot like the Healing Elixir bottles found in the game.


Emptied of Orangina, labels removed, and filled with blue liquid (dyed water, Kool Aid?  Do kids still drink Kool Aid these days?  Will I be shunned by the other mothers for serving dyed sugar water?) with an ankh sticker slapped on the front - this is going to look amazing!  It will be a sacrifice to have to drink 16 bottles of delicious, sweet Organina, but I will do it.  Because I love my son THAT much.  Hold your applause.

Next, my son recently accumulated enough stars for good behavior to earn Spyro's Adventure.  While looking at the Portal of Power in action, I realized that it cycles through different colors...


...which you can NOT see in this picture, but trust me.  It does.  You know what else cycles through different colors AND we have at least 4 of in our basement?  The color-changing lights we put in our Halloween pumpkins.

Color Changing Pumpkin Light

I'm going to try to mount my punch bowl over the pumpkin light and have the colors illuminate the punch.  I'm thinking that a sherbet punch might be the right mix of cloudy and translucent and will allow the light to shine through in the same milky, mystical manner as the portal.  I will also try to fashion a cardboard surround painted to look like the portal and wrap the whole contraption.

I also started construction on some archery targets.  I found huge sheets of cardboard at BJ's (they put out little boxes all the time, but they do have big sheets of cardboard in the back - just ask) and did the pushpin-with-string-tied-to-a-pencil trick to get nice big concentric circles.  I have 4 cut out and will start painting soon.


It doesn't look like much YET, but wait until I paint it!  Then it will have STRIPES!  In ALTERNATING COLORS!!  Boom.  Amazing.  (OK, fine.  It will be like any other archery target you've ever seen, but I worked so hard cutting 4 of these bad boys out that I felt they deserved a mention...  and...  OK, fine.  So I only cut out 2 and I made my husband cut out the rest.  But in my defense, it was REALLY HARD cardboard.  BJ's cardboard is legit.  It don't play.)

Friday, March 8, 2013

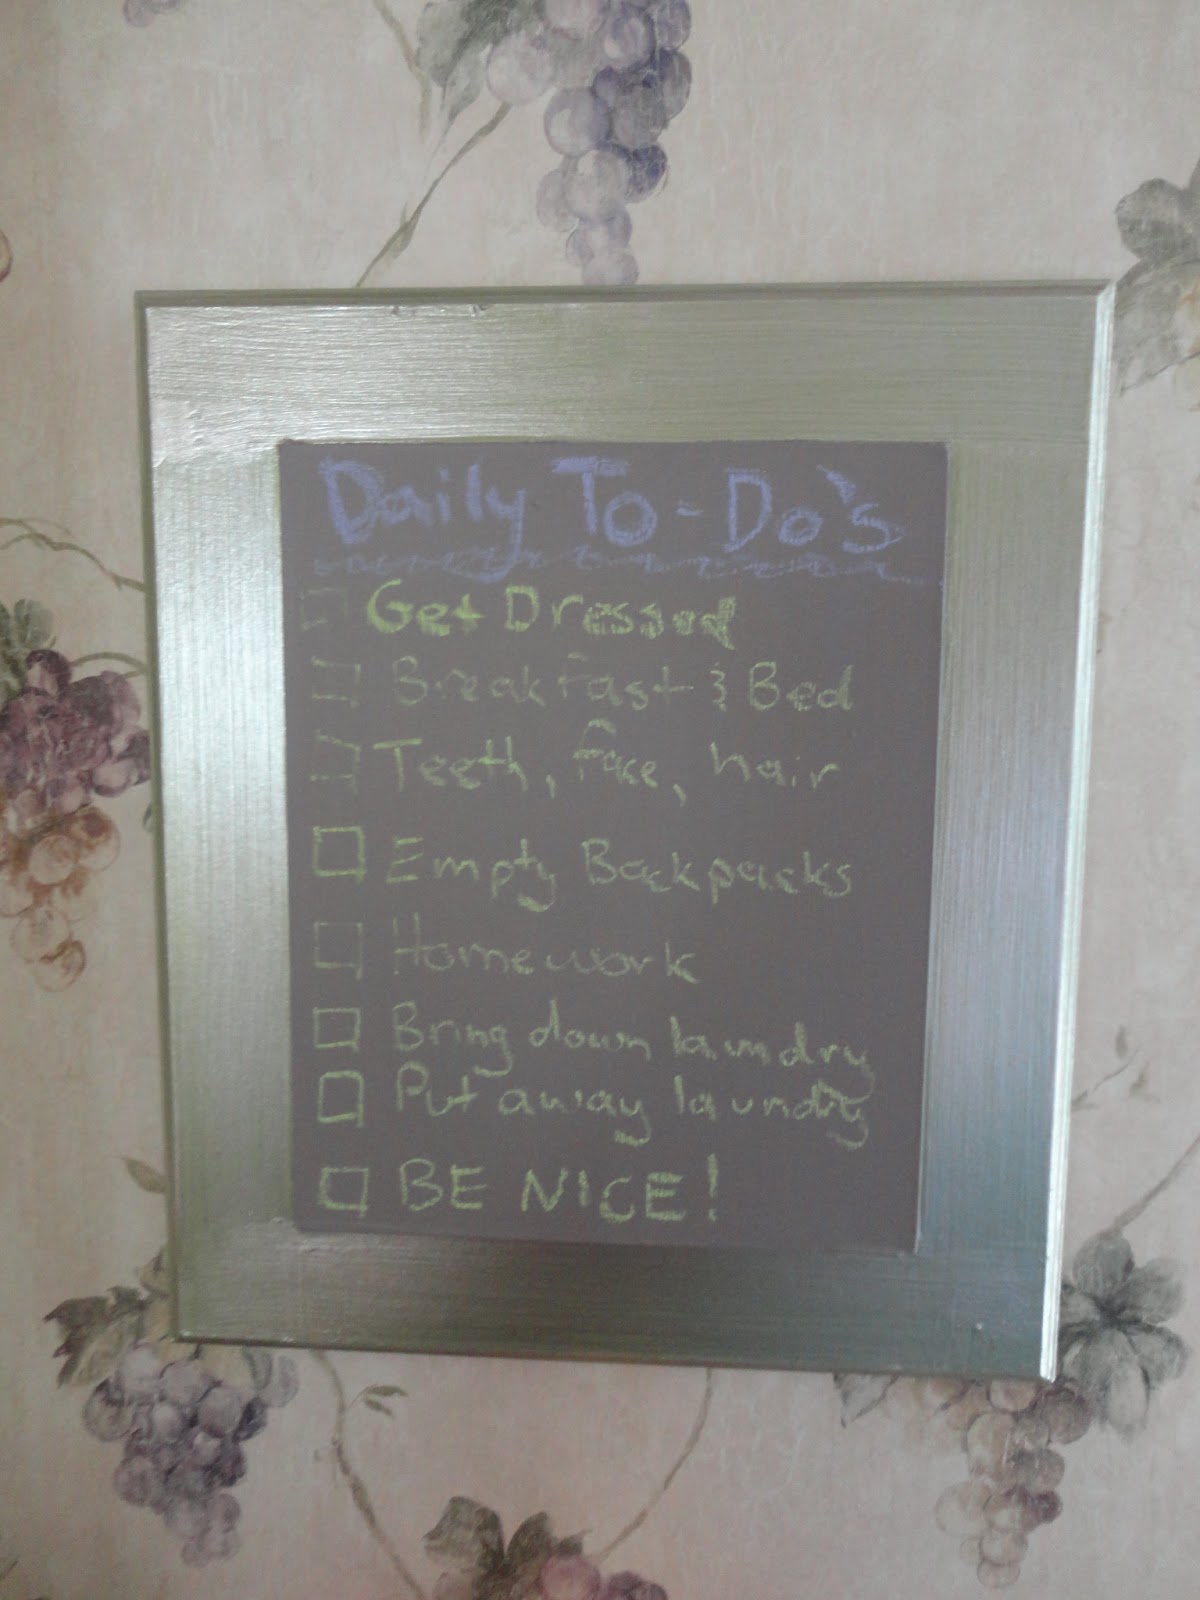
DIY Clearance Aisle / Donation Salvage Chalkboard

So I found this picture at Marshall's on Clearance a few years ago for $2.00.  It depicted 3 French-looking chefs holding a variety of foods and the image was mounted on a black and white checkerboard background.  It was an odd little picture, but it actually worked really well in our old black and white kitchen.  When we moved into our new house, we now had a grapevine kitchen and the picture no longer fit, so I tossed it in the To-Be-Donated box and forgot about it.  Fast-forward to a few months later, when I realized that I really, really wanted a chalkboard in the kitchen to list daily reminders for the kids.  I decided to make my own and packed up the car to drop some stuff at the Goodwill before shopping there for a suitable frame that I could repurpose into said chalkboard.  And there it was in my box - the weird French chefs.  SCORE!  It was just the right size and shape to become a chalkboard.
I painted over the chefs with gray Martha Stewart chalkboard paint from Michael's (coupon!).  Once that was done (3 coats), I painted the background with a little of our leftover green living room paint and then glossed it up with some antique bronze glaze.  Not bad for free!
My lesson from this - shop in your house first.  You might have the perfect thing languishing in your basement or garage, waiting to be transformed into something fresh and new! 

Friday, March 1, 2013

Paris Party - Art, Fashion, and Cuisine


For my daughter's 9th birthday, we came up with a Paris in Pearls theme because we love all things French and pearls are her favorite.  We decided to focus on fashion, art, and cuisine to reflect the theme.
For Fashion, we created a beret-bar.  I made berets out of fleece (no hemming required and unlike felt, it stretches so fit was easy) for each attendee.  I used a tutorial for a Super Mario hat, but just omitted the brim.  I can't find the tutorial now, but I will try to recreate it in a later post if I can.  I deliberately made them all in ivory so there would be no fighting over colors.  I also made a bajillon pins using pin backing from the craft store (use a coupon!) and  fabric rosettes, beads, pearls, rhinestones, silk flowers, whatever I could find that was cheap and fit the vintage-y color scheme. 
The girls could decorate their berets by selecting items from the beret-bar.  We also provided lots of long pearl necklaces and I made a ton of bracelets using stretch magic and stringing beads and pearls.  I threw a few silk flowers glued to ribbons in there as well.  After adorning themselves, the girls could don sunglasses and pose with French thought bubbles in our makeshift photobooth.
Art was the biggest part of the day.  I really wanted the girls to be able to paint, but knew that I didn't have the table space for all of them and couldn't possibly afford 12 easels.  My solution?  I took to the trees!  I tossed a heavy roll of florist ribbon over a branch, cut off the roll, and stapled both ribbon ends to the back of the canvas.  I then repeated this process to suspend a canvas for every girl. 
Covered with a thrift store lace tablecloth, the picnic table made a great area to hold long paint brushes (bought in assorted packs with a coupon at Joann's) in galvanized tin buckets from the thrift store, repurposed mason jars filled with water, a crate of acrylic paints, and little painting palettes bought on clearance at Michael's.  Those were a huge hit. 
My suspended canvases worked out so well and I loved how it served as activity, favor, and decor in one.  One of the mothers gasped when she saw it and said "It's so magical!"  That was one of my proudest party moments!  Bonus - the paintings dried so quickly as they swayed in the breeze.  AND we were able to just snip the ribbons and send them home with short lengths still attached so that the girls could use the ribbons to hang them at home. 
Cuisine was easy - we served brie and Camembert, mini croissants and quiches from BJ's, chocolate mousse, and they sampled Orangina (big hit) and Perrier (big loser).  We also had fruits and veggies and everything had a label with the food item in French and English.  I had also made French-English phrases sheets with phonetic pronunciations - which I forgot to pass out - oops, so I included them in the thank you notes.  We made French cookies (madeleines) and passed those out as favors for departing guests.  And the cake was my very easy and very beautiful Rose Cake, with edible pearls of course -see post here:  Cake Fails and Triumphs 

Sunday, February 17, 2013

Skylanders Party Planning - Part 1, Dollar Store Finds and Paper Straws

So my youngest is turning 7 in a few months and has asked for a Skylanders theme for his party.  My reply - "Awesome!  What's a Skylander?"  You see, he doesn't actually HAVE the Skylanders game or anything.  Chalk it up to the magic of school friends with more video gaming privileges...  Anyway, I am not one to back down from a challenge, so I took to the internet to learn about the Skylanders and hopefully find some ideas that I could translate into a fun, affordable party without too much video game violence.

I was pleased to learn that Skylanders seems like a pretty cute and creative game - yes there is fighting and battle and stuff, but it's pretty mild.  The game boasts lots of bright colors and tons of characters and details to pick from and incorporate into a party.  On the inspiration front, while there are no Skylanders mass market party pieces yet, there are a few great blogs featuring real parties with really creative ideas.  I've used them for inspiration.  Please check them out - they are amazing:

Plucking Daisies
Great creative game ideas and tutorials
Wine and Glue
Clever ideas for a sweet table / candy buffet / candy party favors
Amy's Party Ideas
Beautiful design elements and creative use of printables

It's still early days for me, but I am deep in the planning process.  My kids and I worked together and came up with some great activities - some from the blogs above and some we made up ourselves, each one based on a different element.  Here's our plan...


ELEMENT CRYSTAL CHALLENGE
Collect crystals from each element by completing the challenges at each station.  We may make collection of crystals the key to "unlock" a treasure hunt.  The treasure would be the favor bags.  Still not sure about this. 

AIR
Jet-Vac’s Air Lift:  Keep the balloons in the air by blowing.  No hands.  

LIFE
Zook’s Bamboo Rocket Launch:   Launch foam rockets.  Try to surpass a minimum distance.  Since Zook likes to speak in Haiku, try to write the game sign blurb in Haiku.

MAGIC
Wrecking Ball’s Tongue Grabber:  Snag crystals with sticky hands. 

WATER
Slam Bam’s Ice Crystal Smash:  Freeze crystals in ice balloons.  Remove balloons before party.  Have guests smash ice orbs to release the crystals.

TECH
Trigger Happy’s Target Practice:  Toss coins into a gold bin.

UNDEAD  (Do they have to call it "Undead"?  Wouldn't "Ghost" or "Spirit" be better?)
Chop Chop's Shield Fling:  Try to toss shield (Frisbees) through a wall (crepe paper streamer curtain - will serve as a backdrop for the food table later.

FIRE
Flameslinger’s Fire Arrows:  Try to hit a suspended target (large round disc) with flame arrows.

EARTH
Dino-rang’s Boomerang Toss:  Try to get boomerang to come back to you
 

With these details in place, I have started buying supplies when I see them and let me tell you - I hit the jackpot at the Dollar Trees.  And I say "Trees" plural because I have gone to several different ones in my area and each one had something different / awesome / perfect for this party.  Details below...

Pink sticky hands to look like tongues!
Green rocket launchers to look like bamboo!
We can paint to rockets red to match Zook's!
Boomerangs!  May paint them brown to look more like Dino-Rang's...

Frisbees to use for a shield toss - will mod-podge on an image or Skylanders logo...
Coins to Trigger Happy's coin toss - will paint them shiny gold!
Archery sets for Flameslinger's Arrows - will affix red and gold cello shreds to make the arrow look like shooting flames!
Green balloons for the Chompie stomp - the exact approach is to be determined...  And white and blue balloons for the balloon blow!  These actually came from Five Below.
So as of right now, I have almost all of the supplies needed for 7 of our 8 games, and I've only spent about $40.  Score!

And lastly - this was found at Target - they are catching on to the paper straws and pennants party trends.  I love the color assortment here, although I will swap out the pink for lime green.
Stay tuned for more details as the party comes together!

Friday, February 1, 2013

Making a Princess Theme Work for Girls and Boys


For my daughter's 4th birthday, she asked for a Princess-themed party, which is lovely and all, but what about her little boy friends?  I tried to think of a way to make that theme work for both genders and came up with...  A Royal Ball!  Instead of girly pinks, we went with a jewel tone palette to please the princess and her princes.  Vibrant blues and purples and golds struck just the right regal tone.


All the little lords and ladies adorned themselves with handmade capes (thanks, mom!).


We had a station set up to decorate foam crowns and tiaras.  When ordering the supplies, I found a set at Oriental Trading Company that contained blue, green, and yellow to work for boys.  Also found some great self-adhesive jewels at OTC - it was nice to not have to fiddle with glue and drying time.


Guests were allowed to select their very own magic wands.  The boys used them to duel and the girls used them when they danced about to baroque music.

The centerpiece of the whole event was a cardboard castle that I made and painted myself.  I loosely followed the tutorial here:  Mr. McGroovys's Fantastic Cardboard Rivets  Unfortunately, I found Mr. McGroovy too late and I didn't have time to order the rivets, so I modified the design so that I didn't need them or any other fasteners (I did take his advice for painting it and it was amazing - definitely check it out- it's so easy).  The center arch of the castle is held in place by slits that I cut into each tower.  One advantage to this approach is that I was able to break it down and fold it flat before and after the party.  We kept it to play with for a long while after the party and the kids loved it.  We wouldn't have been able to do that if it wasn't collapsible.


My mom had the brilliant idea to fancy it up with the Dollar Store shield, silk flowers and ferns, and curtains for the windows and entry.  The kids had so much fun bursting through the curtain to dance or fight or whatever else they were pretending to do.


We decorated a plain white arch to serve as the entry to the yard - hot glued flowers and ribbons.  And mom whipped up a game of pin the tail on the unicorn out of felt and silky fringe (she is so talented). 


She also made the felt banners you see here and there in the yard.  All in our jewel tone palette and featuring images specific to my daughter's interests at the time.  We mounted them on bamboo tiki torch poles that she had painted gold.  (In retrospect, an awl might have been helpful to dig the poles a little deeper into the ground.  By the end of the day, they were listing dangerously.)


Mom also revamped a thrift store chair with teal velvet and rhinestones - Voila!  A throne for gift opening or photo ops!  Mental note:  Next time do not put photo op throne in direct sun...


This was also the party with the infamous Sacked-By-The-Huns-Castle-Cake.  Good times!

Pennants and Picture Display

Yep, I hoped on the pennant bandwagon.  There is something so cheery and fun about them, so I decided to make some for our playroom. 


I used a quick and dirty method with minimal sewing.  I made a template by cutting a triangle out of a cereal box.  I then parked my butt in front of the TV with said triangle, my scrap fabric bin, and a pair of pinking shears from Joann's (coupon!) and pinked my way through a stack of colorful calicos.  Once that was done, I laid out a few lengths of ribbon and pinned the triangles at fairly even intervals.  I then ran the whole thing through the sewing machine.  I didn't even take the time to match the thread to the ribbon.  I kind of like the contrast.  The whole process took me an episode of True Blood.  Once done sewing, I mounted a few clear small Command hooks and swagged my banner around the playroom.  I love them in the playroom and I also love that I can use them for parties as well.


Under the pennant banner, I mounted a wire for displaying artwork.  I don't know why it took me so long to do this - I guess I was nervous about putting a hole in the window trim and then not liking the wire.  No worries now - it was well worth the risk.  I bought a picture hanging kit at Lowe's.  The kit consists of a spool of thin wire and some tiny brass hook screws.  There's other stuff in the kit, but I haven't used that part.  I simply screwed the hooks in by hand, threaded a length of wire through each end and wrapped the tails around a few times.  Easy peasy.  Add a couple colorful plastic clothes pins from the Dollar Store and Voila!  Instant extra art display area does double duty as playroom decor.  And because our playroom was an addition and still has the windows that look into the family room, we can put artwork facing into both room for double the display space.